Category Archives: linux

Converting lots of audio files to lower quality with soundKonverter

Notes for myself but maybe useful for *you* too?

https://github.com/dfaust/soundkonverter

Add your directory or directories, let it scan.

For music select Opus with 48 kbps if that’s enough for your use case.

Create the file list, then fix special characters with https://github.com/dfaust/soundkonverter/issues/96: sed -i 's/file:\/\///; s/%20/ /g; s/%23/#/g' ~/.local/share/soundkonverter/filelist.xml

For audiobooks use Opus with a low bitrate of 16 kbps and the Additional encoder argument -ac 1 for mono.

Copy directory structure will create full path directories in the destination directory, e.g. if you convert /home/foo/music/ to /tmp/, it will create the output in /tmp/home/foo/music/.

For future updates: Select the same directories, fix the xml again, make sure that Settings -> General -> Conversion -> Conflict Handling is set to “Skip File”.

Waveshare Pico-RGB-LED with a Raspberry Pi via Thonny on Archlinux

https://www.waveshare.com/wiki/Pico-RGB-LED is horribly broken and this was hard to Google so hopefully this helps *you* or future-me.

I did not manage to put the display directly on top of the Pico as a hat. Also my display’s board has its pins numbered and labelled mirrored when comparing to the official pin out. FFS…!?


Install pico-sdk and thonny from AUR.

$ sudo usermod -a -G uucp $USER

Reboot.

Make sure you aren’t full of static electricity. Hold the BOOTSEL button on your PI and connect it to your PC using a USB cable.

It should appear as storage device.

Start Thonny, select “Micropython (Raspberry Pi Pico)” as interpreter and use its “Install or update MicroPython” option. This does that “copy some RPI_PICO-20231005-v1.21.0.uf2 file to your Pico in mass storage mode” step for you.

The Thonny shell should say something like:

MicroPython v1.21.0 on 2023-10-06; Raspberry Pi Pico with RP2040
Type "help()" for more information.
>>>

Enter the following code in your Thonny shell (via):

from machine import Pin
led = Pin(25, Pin.OUT)
led.on()

The Pico’s green LED should glow now. Use led.off() to turn it off again.

Unplug your Pico. Make sure you aren’t full of static electricity.

Connect your Pico and Waveshare Pico-RGB-LED like described in https://thepihut.com/blogs/raspberry-pi-tutorials/how-to-use-the-waveshare-rgb-full-colour-led-matrix-panel-for-raspberry-pi-pico-part-1:

On the display there are four pins in a length-wise direction on the board.

Connect:

  • The display’s 5V to your Pico’s VBUS (pin 40)
  • The display’s GND to your Pico’s GND (pin 38)
  • The display’s DIN to your Pico’s GP6 (pin 9)

References:

Have fun!

https://www.twilio.com/blog/programming-raspberry-pi-pico-microcontroller-micropython

https://thepihut.com/blogs/raspberry-pi-tutorials/how-to-use-the-waveshare-rgb-full-colour-led-matrix-panel-for-raspberry-pi-pico-part-1

https://docs.micropython.org/en/latest/esp8266/tutorial/neopixel.html

To make a script launch upon booting, save it with Thonny to the Pico with the name main.py.

moOde audio player 8 on a Raspberry Pi 3 Model B Rev 1.2 with Hifiberry Amp2 1.1

It’s super easy but watch out because volume levels are messed up (super loud on tiny volume values!).

Flash the image with RPI imager (enable SSH)

/boot/config.txt might need dtparam=audio=off but I don’t remember, try without that change.

Boot the device

Visit http://moode.lan (or fix your network, use the IP etc) and click “m” -> “Settings”

“Audio” -> “Audio Output” -> “I2P”: Select “HifiBerry Amp2”

Restart

Use your favorite MPD client (or the web UI) to play some music (FIRST SET A LOW VOLUME for safety, 100 is insane here, ~20 is room level). It should work already, if not, troubleshoot.

“Audio” -> “ALSA Options” -> “Max volume (%)” seems to do nothing

“Audio” -> “MPD Options” -> “Volume options” -> “Max MPD volume”: Set to 30% so at least in the Web UI of moOde you won’t be able to kill your speakers.

In your other MPD clients, make sure you never set a high volume…

Music on connected storage will be discovered automatically and added to your library.

Backing up Hetzner snapshots locally

Hetzner is a nice, cheap host for server. Unfortunately they do not let you download backups and snapshots of cloud servers locally. So you are kind of locked in with them.

Here is how I create full disk backups for e.g. standard CX11 servers with default images.

Make sure you understand everything before you attempt this. Pay special attention to your own partitions and make sure you archive what you really need. Consider imaging the whole device instead of just a partition.

Create a backup

  • Create a new snapshot of your server
  • Create a new server from it
  • Boot said server in rescue mode
  • Use good old dd and gzip to image the main disk to a local archive
  • ssh root@SERVERIP "dd if=/dev/sda1 bs=1M status=progress | gzip -" | dd of=SERVERIP.sda1.dd.gz bs=1M
    • The bs=1M is fairly random by me, worked well, didn’t care to optimize
    • gzip (with the default compression level) kind of maxed out the server CPU but still enabled me to almost max out my download bandwidth. Of course the ratio between remote CPU compression speed vs download bandwidth depends on your specific situation. You might want to use xz or zstd instead.
  • Don’t be stupid, do it twice and compare the checksums

If you do not need your server to be live during backup, you can skip the snapshotting and second server of course, just boot your server in rescue mode instead.

Build a new server from a backup

  • Create a new server using the same or a similar configuration as the backed up one
  • Boot said server in rescue mode
  • cat SERVERIP.sda1.dd.gz | ssh root@SERVERIP "gunzip -c | dd of=/dev/sda1 bs=1M status=progress conv=fsync"
  • Reboot to leave rescue mode

If you want to restore your server because of a breakage, just boot it into rescue mode and do the same as above otherwise.

I can’t read file contents from my Android SD card on Linux and it’s weird

Conclusion: The files are encrypted with Android’s file-based encryption. The SD card is broken.

The SD card is broken. The internet says it is typical for SD cards to go read-only as a symptom of fail. Trying to rsync or ddrescue the card’s contents using a separate devices led to stalls and read errors.

I might be able to salvage some of the files by using Android’s share functionality but there was nothing important on the card so I won’t bother trying. The card is broken beyond repair and all files are lost.


I want to backup my Android SD card so I inserted it to my computer (tried multiple ones by now). I can see the file tree and browse it just fine. But if I try to read a file, it fails because instead of the actual file contents, all I get is some gibberish. Weirdly enough, the file header is partially identical between different files and contains the words “whatever” and “CONSOLE”. When inserted in my phone I can read and use those files just fine. The phone is a Sony Xperia XZ1 Compact.

Here are some example hexdumps of the file headers from some JPG and OPUS files:

00000000  00 00 00 00 00 37 d5 23  d8 c3 44 86 e4 42 f3 73  |.....7.#..D..B.s|
00000010  03 00 00 02 00 00 10 00  00 02 8c 2d 04 09 03 01  |...........-....|
00000020  77 68 61 74 65 76 65 72  60 ed 60 a5 16 dd d0 08  |whatever`.`.....|
00000030  34 0d 25 2b 87 d1 df 18  94 8a f8 cf f0 fd 83 d9  |4.%+............|
00000040  06 5a 4e 48 8c a1 b9 51  98 ed 16 62 08 5f 43 4f  |.ZNH...Q...b._CO|
00000050  4e 53 4f 4c 45 00 00 00  00 60 40 2d b1 41 51 c1  |NSOLE....`@-.AQ.|
00000060  10 00 00 00 00 00 00 00  00 00 00 00 00 00 00 00  |................|
00000070  00 00 00 00 00 00 00 00  00 00 00 00 00 00 00 00  |................|
*
00002000  c7 27 3f d6 7e 99 3d 6b  d3 dc 0a a7 c9 28 37 d5  |.'?.~.=k.....(7.|
00002010  59 09 8b 4b 3e 1b 20 54  a8 87 fc 90 fd 31 05 5b  |Y..K>. T.....1.[|
...
0037ffe0  f1 9a 2d fa fd a1 4b 2a  22 dc ce 29 9d 83 3a 5a  |..-...K*"..)..:Z|
0037fff0  dc 97 e0 e9 15 d7 16 55  82 a6 57 6b 7f b0 32 7d  |.......U..Wk..2}|
00380000
00000000  00 00 00 00 00 03 5d 1d  aa ab 3d 85 96 2a 8a 70  |......]...=..*.p|
00000010  03 00 00 02 00 00 10 00  00 02 8c 2d 04 09 03 01  |...........-....|
00000020  77 68 61 74 65 76 65 72  60 90 17 d4 8b ef 31 35  |whatever`.....15|
00000030  22 b9 b3 05 59 37 3b 71  7e e1 4a 6e af a2 07 b2  |"...Y7;q~.Jn....|
00000040  4b 9a bb 7e 6a 46 18 70  29 ed 16 62 08 5f 43 4f  |K..~jF.p)..b._CO|
00000050  4e 53 4f 4c 45 00 00 00  00 60 40 2d b1 41 51 c1  |NSOLE....`@-.AQ.|
00000060  10 00 00 00 00 00 00 00  00 00 00 00 00 00 00 00  |................|
00000070  00 00 00 00 00 00 00 00  00 00 00 00 00 00 00 00  |................|
*
00002000  32 23 5d 69 cb 14 d0 75  8a 9c 2e 64 67 26 1a fc  |2#]i...u...dg&..|
00002010  12 77 ad 48 9b f4 9e d4  d5 08 48 33 cb 45 6b 90  |.w.H......H3.Ek.|
...
00037fe0  87 09 0c 80 6c 4b 6a 54  fb c2 70 13 bc 0a c9 ab  |....lKjT..p.....|
00037ff0  89 3b 52 40 f2 cc df f4  d3 65 e1 c4 0d e3 74 ea  |.;R@.....e....t.|
00038000
00000000  00 00 00 00 00 01 78 41  33 26 6e 9c 0f a7 d9 69  |......xA3&n....i|
00000010  03 00 00 02 00 00 10 00  00 02 8c 2d 04 09 03 01  |...........-....|
00000020  77 68 61 74 65 76 65 72  60 2e 2d e8 1b cd 47 11  |whatever`.-...G.|
00000030  7e b6 e7 e2 95 84 85 75  81 42 0f 5c 54 48 3e 4b  |~......u.B.\TH>K|
00000040  c7 3c f6 cf 16 ec 9f 6b  51 ed 16 62 08 5f 43 4f  |.<.....kQ..b._CO|
00000050  4e 53 4f 4c 45 00 00 00  00 60 40 2d b1 41 51 c1  |NSOLE....`@-.AQ.|
00000060  10 00 00 00 00 00 00 00  00 00 00 00 00 00 00 00  |................|
00000070  00 00 00 00 00 00 00 00  00 00 00 00 00 00 00 00  |................|
*
00002000  97 9d 44 91 25 8e b4 e0  07 31 31 bc cc c0 44 13  |..D.%....11...D.|
00002010  62 0e 6d c1 49 8d 87 fe  5d c7 ff c0 cc b5 4c 08  |b.m.I...].....L.|
...
00019fe0  ae 2b d1 04 db d2 9c 9e  e7 cd 3a 06 aa 5a 85 5f  |.+........:..Z._|
00019ff0  d3 7a 30 33 f2 3a b1 2f  73 40 50 f7 a9 a6 d7 fa  |.z03.:./s@P.....|
0001a000

fdisk shows the partition as “W95 FAT32 (LBA)“.

What’s going on?

I found some mentions of this issue on the web:

https://old.reddit.com/r/techsupport/comments/f88bd7/files_on_sd_card_taken_out_of_phone_wont_open/ posted “iu>i'Õè Œ- whatever`P‘Ã@C“Žâ=ë q¸ÌÔ9rÊ ¯Ø¶Þ¨Kíb_CONSOLE ]ŽÒ[Ó_” without a solution.

https://www.computerbase.de/forum/threads/videodatei-samsung-a-3-2016-am-pc-abspielen.1737550/ posted “@Âù©õš•Bo   Œ-  `»Üž¸½\ht1Oc.ä9á²5Ñé’Ž<žŸ9Ûßíb_CONSOLE Øþ«fQ¿É“, also without a solution. The phone involved was a Samsung A3 2016.

https://www.nikon-fotografie.de/community/threads/jpg-dateien-pl%C3%B6tztlich-nicht-mehr-lesbar.281280/ posted “#µ=Äõ¶EBC   Œ-  "3DUfw`â￾Lü4OOŸ-›·j.^aÌ?–ôaÚ ”YÜíb_CONSOLE .øŒ¤Èœ«é ‰'ñÏÆísÿä‰â¢THû´/Ò†´< bb·7iìÕ“, also without a solution.

https://superuser.com/questions/975695/reading-encrypted-files-from-android-microsd-card posted three examples, all also having at least the “b._CONSOLE” portion, Samsung Galaxy S3 device. No solution but a user commenting that “This is related to Samsung Knox and these signatures are Samsung specific” which seems unlikely as I am using a Sony device…

^ See the top of the post for my conclusion ^

10 year old posts from an older blog at enjoys.it

Just for save-keeping, probably irrelevant nowadays but who knows what kind of travelers search engines might send here. Tread lightly!

Remove the huge margins from PDF papers

Remove the huge margins from PDF papers eg. prior to printing with pdfcrop from the pdftk suite. For example:

pdfcrop --margins -80 input.pdf output.pdf

edit, much better:

$ pdfimages -j file.pdf file
$ mogrify -crop 800x1300+220+220 +repage file-0*.jpg
$ convert file-0*.jpg cropped.pdf

+repage makes IM not write the offset to the files but actually crop “properly”. Maybe pdfcrop has such parameter too?

Installing a printer in Cups via a USB->Serial adapter

Make sure to “modprobe usbserial“. dmesg should show a printer being connected if you plug it in now. Then Cups should see it too.

RTTY with SDR# and fldigi (for the german DWD stations)

In SDR#: Use USB, filter bandwidth 1000. center the RTTY in your window.

In fldigi: Op Mode -> RTTY -> Custom. Set the carrier shift to custom and then enter 450 in the custom shift field below. Baud rate: 50, 5 bits per character, no parity, 1.5 stop bits. Save and Close. Make sure the Rv button is green!

CW decoding with SDR# and fldigi

In SDR#: Use the CW-L or CW-U preset. Tune so the morse code is right in the middle of your “reception window”.

In fldigi: Op Mode -> CW. Turn off squelch by making the SQL button not green but grey.

It works very well for non-human morse for me. Radio amateur morse is harder and so far full of “spelling errors”. :)

PDF to image with imagemagick/graphicsmagick

If you want to create images from PDF files, use for example mogrify -verbose -geometry 1600 -density 300 -format png *.pdf Without a decent “-density” parameter, you will probably get a blurry image as result.

Making your Ryzen CPU less hot by throttling boost on Linux

echo 0 | tee /sys/devices/system/cpu/cpufreq/boost

Might work, might not, depending on unknown factors. Whatever, I just wanted to make some all-core-but-unimportant process to run without going 95°C. For that it worked perfectly well. CPU temps of a Ryzen 5 3600 after many hours of full utilization were at ~65°C. CPU frequencies were capped to 3.6GHz with this while jumping up to 4.2GHz (and ~94°C) without.

Obviously this has an impact on performance.

To re-enable just echo a 1 instead. This is reset anyways when you reboot your system.

Using a Tiardey USB Single Foot Pedal (PCsensor FootSwitch) on Linux

This post’s purpose is to link “Tiardey USB Single Foot Pedal Optical Switch Control One Key Programm Computer Tastatur Maus Game Action HID” to “PCsensor” and the footswitch tool on search engines so others who wonder if the device is easy to use on Linux learn that this is the case. Hope it helps!

I bought this https://www.amazon.de/dp/B09TQFBS3C which came with a chinese/manual saying “FS2007 User Manual” and also says “FS2007U1SW (mechanical switch)” (mine clicks, so I guess it is not the “FS2007U1IR (silent photoelectric switch)”. The manual links to pcsensor.com for Windows drivers.

Plugin the device. dmesg should show something like:

[Sun Jan 8 20:25:05 2023] usb 1-4: new full-speed USB device number 7 using xhci_hcd
[Sun Jan 8 20:25:05 2023] usb 1-4: New USB device found, idVendor=1a86, idProduct=e026, bcdDevice= 0.00
[Sun Jan 8 20:25:05 2023] usb 1-4: New USB device strings: Mfr=1, Product=2, SerialNumber=0
[Sun Jan 8 20:25:05 2023] usb 1-4: Product: FootSwitch
[Sun Jan 8 20:25:05 2023] usb 1-4: Manufacturer: PCsensor
[Sun Jan 8 20:25:06 2023] input: PCsensor FootSwitch Keyboard as /devices/pci0000:00/0000:00:14.0/usb1/1-4/1-4:1.0/0003:1A86:E026.0001/input/input19
[Sun Jan 8 20:25:06 2023] input: PCsensor FootSwitch Mouse as /devices/pci0000:00/0000:00:14.0/usb1/1-4/1-4:1.0/0003:1A86:E026.0001/input/input20
[Sun Jan 8 20:25:06 2023] input: PCsensor FootSwitch as /devices/pci0000:00/0000:00:14.0/usb1/1-4/1-4:1.0/0003:1A86:E026.0001/input/input21
[Sun Jan 8 20:25:06 2023] hid-generic 0003:1A86:E026.0001: input,hidraw0: USB HID v1.11 Keyboard [PCsensor FootSwitch] on usb-0000:00:14.0-4/input0
[Sun Jan 8 20:25:06 2023] input: PCsensor FootSwitch as /devices/pci0000:00/0000:00:14.0/usb1/1-4/1-4:1.1/0003:1A86:E026.0002/input/input22
[Sun Jan 8 20:25:06 2023] hid-generic 0003:1A86:E026.0002: input,hidraw1: USB HID v1.10 Device [PCsensor FootSwitch] on usb-0000:00:14.0-4/input1
[Sun Jan 8 20:25:06 2023] usbcore: registered new interface driver usbhid
[Sun Jan 8 20:25:06 2023] usbhid: USB HID core driver
[Sun Jan 8 20:25:10 2023] usb 1-4: reset full-speed USB device number 7 using xhci_hcd

Sweet, so it is just some rebranded PCsensor device.

lsusb says ID 1a86:e026 QinHeng Electronics FootSwitch btw.

There is a great little tool for configuring those on Linux: https://github.com/rgerganov/footswitch

footswitch -m ctrl -k 1 will configure it to send Ctrl+1 when pressed for example. See the readme for usage and more examples.

You can use more than 3 of these devices via this pull request. I have four connected via a USB hub 1a40:0101 (“Terminus Technology Inc. Hub (branded “hama”), https://www.amazon.de/dp/B08YRZT1RL) and they work just fine.

Converting a whole directory tree of FLAC files to opus/vorbis and deleting the originals

Because I just did it and might need to do it again, e.g.:
fd -t f -e flac -x bash -c 'ffmpeg -i "$1" -b:a 64k "$1".ogg && echo rm "$1"' bash {}

Remove the echo to make it actually delete the originals.

via https://wiki.archlinux.org/title/Convert_FLAC_to_MP3#Parallel_with_recursion

Or to write them to another directory, keeping the original structure intact:

cd /dir/to/convert && fd -t f -e flac -x bash -c 'D=$(dirname "{}"); B=$(basename "{}"); mkdir -p "/dir/to/write/to/$D"; ffmpeg -i "{}" "/dir/to/write/to/$D/${B%.*}.opus"' bash {}

via https://quantixed.org/2021/11/20/convertible-using-ffmpeg-to-convert-audio-files/

^ Nope, that seems to miss files…

You should probably use beets or something…

soundKonverter is a nice tool too.

Your own little internet speed monitor

I wanted to monitor my ISP’s service over time and could not find any available simple tool for that. The usual system monitoring tools are usually displaying averages, not min/max values. So I used WD40 (speedtest-cli) and duct tape (cron) to make my own.

You need to have a cron daemon set up and speedtest-cli installed.

Then prepare an empty csv file with a header like this (don’t forget a trailing newline!) and store it in a path of your choice:

Server ID,Sponsor,Server Name,Timestamp,Distance,Ping,Download,Upload,Share,IP Address

Set up a cronjob at an interval of your choice (don’t be a dick) to run a speed test and log the results to the csv file:

@hourly speedtest --csv >> /home/user/path/to/speedtest.csv

If you have a fast connection you might spot slow test servers that would badly bias your results, so exclude them using the --exclude option if necessary.

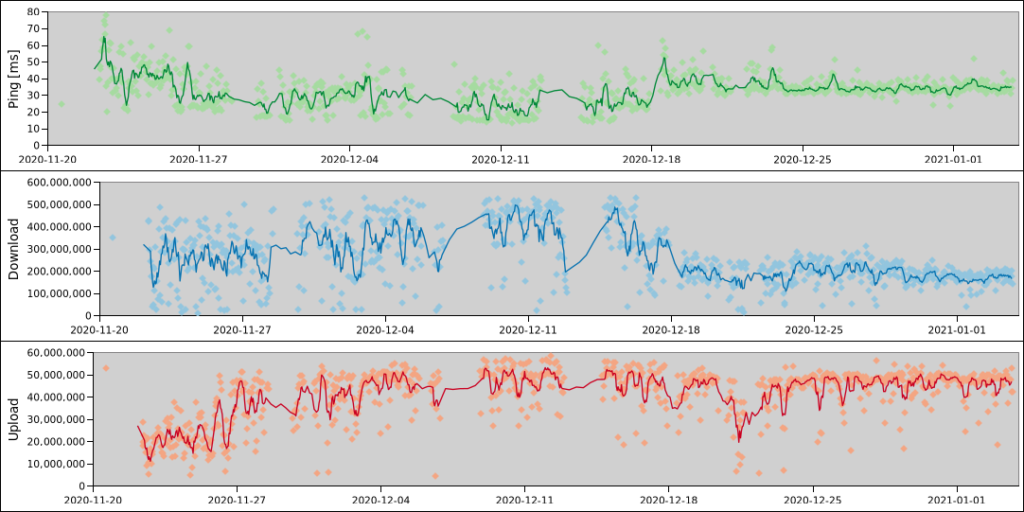
That’s all, you get a nice log of internet ping, upload and download speeds, ready to be visualized in your software of choice (like the best spreadsheet software in existence). I will have to complain to my ISP for that drop since mid December for sure:

And now that I have written this, I realise that for plotting I could also just use a min/max function for a moving time window in Grafana I guess? The speedtests would still be triggered and provide nice bursts of usage. Anyone got pointers on how to do that?