Category Archives: python

Waveshare Pico-RGB-LED with a Raspberry Pi via Thonny on Archlinux

https://www.waveshare.com/wiki/Pico-RGB-LED is horribly broken and this was hard to Google so hopefully this helps *you* or future-me.

I did not manage to put the display directly on top of the Pico as a hat. Also my display’s board has its pins numbered and labelled mirrored when comparing to the official pin out. FFS…!?


Install pico-sdk and thonny from AUR.

$ sudo usermod -a -G uucp $USER

Reboot.

Make sure you aren’t full of static electricity. Hold the BOOTSEL button on your PI and connect it to your PC using a USB cable.

It should appear as storage device.

Start Thonny, select “Micropython (Raspberry Pi Pico)” as interpreter and use its “Install or update MicroPython” option. This does that “copy some RPI_PICO-20231005-v1.21.0.uf2 file to your Pico in mass storage mode” step for you.

The Thonny shell should say something like:

MicroPython v1.21.0 on 2023-10-06; Raspberry Pi Pico with RP2040
Type "help()" for more information.
>>>

Enter the following code in your Thonny shell (via):

from machine import Pin
led = Pin(25, Pin.OUT)
led.on()

The Pico’s green LED should glow now. Use led.off() to turn it off again.

Unplug your Pico. Make sure you aren’t full of static electricity.

Connect your Pico and Waveshare Pico-RGB-LED like described in https://thepihut.com/blogs/raspberry-pi-tutorials/how-to-use-the-waveshare-rgb-full-colour-led-matrix-panel-for-raspberry-pi-pico-part-1:

On the display there are four pins in a length-wise direction on the board.

Connect:

  • The display’s 5V to your Pico’s VBUS (pin 40)
  • The display’s GND to your Pico’s GND (pin 38)
  • The display’s DIN to your Pico’s GP6 (pin 9)

References:

Have fun!

https://www.twilio.com/blog/programming-raspberry-pi-pico-microcontroller-micropython

https://thepihut.com/blogs/raspberry-pi-tutorials/how-to-use-the-waveshare-rgb-full-colour-led-matrix-panel-for-raspberry-pi-pico-part-1

https://docs.micropython.org/en/latest/esp8266/tutorial/neopixel.html

To make a script launch upon booting, save it with Thonny to the Pico with the name main.py.
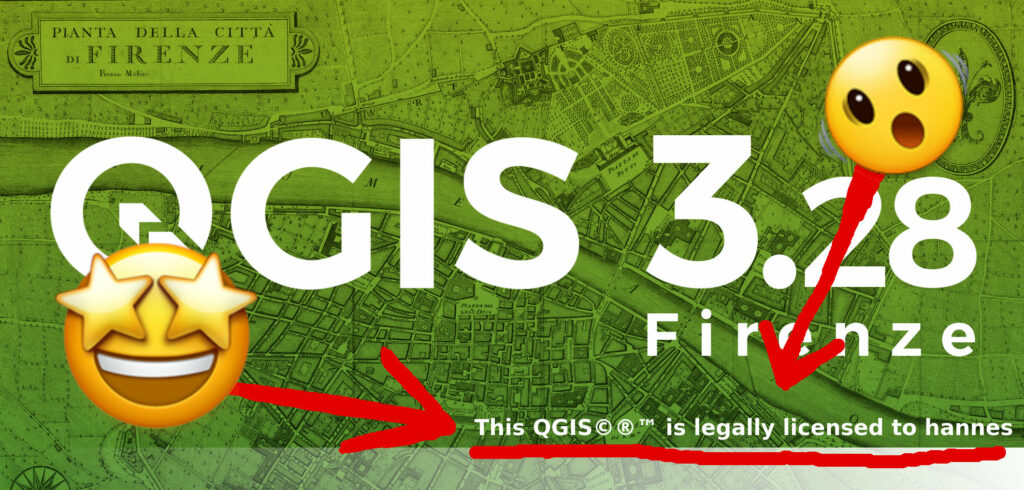
Properly setting up your QGIS license

If you want your copy of QGIS display it’s legal licensing status, this is the missing code for you.

Copy this in your QGIS Python script editor (WARNING: DO NOT RUN THIS IN AN IMPORTANT USER PROFILE, I will NOT help you if it breaks something):

import os
from qgis.core import QgsApplication, QgsSettings
from qgis.PyQt.QtGui import QColor, QImage, QPainter, QPen, QStaticText
from qgis.PyQt.QtWidgets import QMessageBox

def install_qgis_license():
    # WARNING: This fucks around with your profiles and stuff!
    # QgsCustomization is not available from Python so just yolo here and write a fresh file if possible
    profile_directory = QgsApplication.qgisSettingsDirPath()
    customization_ini_filepath = profile_directory + "QGIS/QGISCUSTOMIZATION3.ini"

    if os.path.isfile(customization_ini_filepath):
        # ain't gonna be touchin dat!
        text = (
            "QGISCUSTOMIZATION3.ini EXISTS! UNLICENSED HACKING DETECTED!\n"
            "Or: Custom license has been installed already...\n"
            "Anyways, we are not creating a *new* license now ;)"
        )
        messagebox = QMessageBox()
        messagebox.setText(text);
        messagebox.exec()
        return

    # get existing splash image
    splash_path = QgsApplication.splashPath()  # :/images/splash/
    splash_image_file = splash_path + "splash.png"
    splash_image = QImage(splash_image_file)

    # paint new splash image
    new_splash_image = QImage(splash_image)
    painter = QPainter()
    painter.begin(new_splash_image)

    # white bold font plz
    font = QgsApplication.font()
    font.setBold(True)
    painter.setFont(font)
    pen = painter.pen()
    pen.setColor(QColor("white"))
    painter.setPen(pen)

    # place text at appropriate location
    label_text = f"This QGIS©®™ is legally licensed to {os.getlogin()}"
    label_text_rect = painter.boundingRect(0, 0, 0, 0, 0, label_text)  # returns new rect that fits text
    left_offset = new_splash_image.width() - label_text_rect.size().width() - 20
    painter.drawText(left_offset, 840, label_text)

    painter.end()

    # create license dir if necessary
    new_splash_dir_path = profile_directory + "license"
    try:
        os.mkdir(new_splash_dir_path)
    except FileExistsError:
        pass

    save_success = new_splash_image.save(new_splash_dir_path + "/splash.png")
    if save_success:
        print(f"Initialized new QGIS license....")
    else:
        print("Error on QGIS license initialization, this will get reported!")
        return

    # enable license dir for splash image lookup in QGISCUSTOMIZATION3.ini
    with open(customization_ini_filepath, "w") as sink:
        sink.write("[Customization]\n")
        sink.write(f"splashpath={new_splash_dir_path}/")  # must have trailing slash

    # enable loading of QGISCUSTOMIZATION3.ini in user profile
    QgsSettings().setValue(r"UI/Customization/enabled", True)
    
    print("License installed, reboot QGIS to activate!")
    messagebox = QMessageBox()
    messagebox.setText("License installed, restart QGIS now to activate!");
    messagebox.exec()

#install_qgis_license()

Then (if you really want to do it), uncomment the function call in the last line and execute the script. Follow the instructions.

To clean up remove or restore the QGIS/QGISCUSTOMIZATION3.ini file in your profile and remove the license directory from your profile, restore the previous value of UI/Customization/enabled in your profile (just remove the line or disable Settings -> Interface Customization).

If you want to hate yourself in the future, put it in a file called startup.py in QStandardPaths.standardLocations(QStandardPaths.AppDataLocation) aka the directory which contains the profiles directory itself.

BTW: If you end up with QGIS crashing and lines like these in the error output:

...
Warning: QPaintDevice: Cannot destroy paint device that is being painted
QGIS died on signal 11
...

It is probably not a Qt issue that caused the crash. The QPaintDevice warning might just be Qt telling you about your painter being an issue during clean up of the actual crash (which might just be a wrong name or indentation somewhere in your code, cough).

How to build your own aerial image Twitter bot

https://gitlab.com/Hannes42/twitter-image-bot

About a year ago I built a small Twitter bot that posts an aerial image of Hamburg, Germany every day.

As I will shut it down (no reason, just decluttering) here’s how it works so you can run your own:

  1. Have aerial images with a permissive license
  2. Register a Twitter account and set it up for posting via API access
  3. Write code to pick an image and post it

Done!

Okok, I am kidding.

I used https://suche.transparenz.hamburg.de/dataset/digitale-orthophotos-belaubt-hamburg3 as data source because they have a CC-BY like license, allowing such a project without any legal complications. As a side benefit these images are already provided in tiles: There is not one big image of the whole region but 1km² image tiles. Perfect for random selection, quick resizing and posting.

Registering a Twitter account and setting it up is a privacy nightmare and, being a good human being as you are, you ought hate any part of it. I followed the Twython tutorial for OAuth1 in a live Python interpreter session which was fairly painless. If you do not want to link a phone number to your Twitter account (see above for how you should feel about that), this approach worked for me in the past but I bet they use regional profiling or worse so your luck might differ.

Next you need some code to do the work for you automatically. Here is what I wrote with Pillow==7.0.0 for the image processing and twython==3.8.2 for posting:

import glob
import random
from io import BytesIO

from PIL import Image
from twython import Twython

## Initialise Twitter
# use a Python interpreter to follow the stops on 
# https://twython.readthedocs.io/en/latest/usage/starting_out.html#oauth-1-user-authentication 
# don't rush, there are some intermediate keys iirc...
APP_KEY = '1234567890ABCDEFGHIJKLMNO'
APP_SECRET = '12345678901234567890123456F8U0CAKATAWAIATATAEARAAA'
OAUTH_TOKEN = '1234567890123456789123456F8U0CAKATAWAIATATAEARAAAA'
OAUTH_TOKEN_SECRET = '123456789012345678901234567890FFSFFSFFSFFSFFS'
twitter = Twython(APP_KEY, APP_SECRET, OAUTH_TOKEN, OAUTH_TOKEN_SECRET)

## Prepare the image
# via https://twython.readthedocs.io/en/latest/usage/advanced_usage.html#posting-a-status-with-an-editing-image

# Pick the image
jpegs = glob.glob("DOP20_HH_sommerbefliegung_2019.zip/*.jpg")
todays_image = random.choice(jpegs)
print(f"Today we will post {todays_image}")
photo = Image.open(todays_image)

# Resize the image
basewidth = 1000
wpercent = (basewidth / float(photo.size[0]))
height = int((float(photo.size[1]) * float(wpercent)))
resized_photo = photo.resize((basewidth, height), Image.ANTIALIAS)

# "Save" the resulting image in temporary memory
stream = BytesIO()
resized_photo.save(stream, format='JPEG')
stream.seek(0)

## We've got what we need, let's tweet
license = "dl-de/by-2-0 (Freie und Hansestadt Hamburg, Landesbetrieb Geoinformation und Vermessung)"
tweet = f"Das ist #IrgendwoInHH, aber wo denn nur?\n\n#codeforhamburg\n\nBild: {license}"

response = twitter.upload_media(media=stream)
twitter.update_status(status=tweet, media_ids=[response['media_id']])

First we initialize that Twython thingie, then we pick a random image from a directory of .jpg files, then we resize it to a maximum of 1000 pixels (you can simplify that if your images are square…) and finally we post it to Twitter.

Set up a cronjob or systemd timer or alarm clock to run the script as often as you like and that’s it.

Finding the most popular reaction in Slack

This can be run against a Slack export. It will count the reactions used and display them in an ordered list. Written for readability not speed or efficiency. No guarantees that this isn’t terribly broken. Enjoy and use responsibly!

import json
import glob
import collections

# collect messages
messages = []
for filename in glob.glob('*/*.json'):
    with open(filename) as f:
        messages += json.load(f)

# extract reactions
reactions = []
for message in messages:
    if "reactions" in message:
        reactions += message["reactions"]

# count reactions
reaction_counter = collections.Counter()
for reaction in reactions:
    reaction_counter.update({reaction["name"]: reaction["count"]})

# done, print them
print(reaction_counter.most_common())

I tried to package a package+CLI+GUI for Python

And I gave up trying.

Here is our project: https://gitlab.com/g2lab/cogran-python

  • There is a python package in cogran/.
  • There are scripts in scripts/, one CLI interface, one QT GUI.
  • There are docs in docs/.

The GUI uses images and text from the docs for live help.
So we need to make sure that our docs directory is included when packaging this all for others to install.

I tried for two days to make sense of the jungle of Python packaging. StackOverflow is full of non-explanatory half-answers, there are about 7 APIs implemented by 35 different projects with 42 different documentations and 98 different versions. Either I massively failed to find the one, wonderful, canonical, documented approach or this really is neither explicit nor beautiful.

So I give up. Can you help me out?

Do we need to integrate the docs into the actual package? Should we instead have three separate things: The cogran module package, a cogran-cli package, a cogran-gui package?

The setup

For building I used

rm -r build/ dist/ cogran.egg-info/ ; \
python setup.py sdist && \
python setup.py bdist_wheel

For looking into the resulting archives I used

watch tar tvf dist/cogran-0.1.0.tar.gz

and

watch unzip -t dist/cogran-0.1.0-py3-none-any.whl

For installing I used

pip uninstall --yes cogran ; \
pip install --no-cache-dir --user --upgrade dist/cogran-0.1.0.tar.gz && \
find ~/.local/ | grep cogran

and

pip uninstall --yes cogran ; \
pip install --no-cache-dir --user --upgrade dist/cogran-0.1.0-py3-none-any.whl && \
find ~/.local/ | grep cogran

What happens

sdist includes all kinds of stuff like the .gitignore and the examples directory. Both should not be included at the moment. Installing the resulting cogran-0.1.0.tar.gz will just install the package (cogran/__init__.py) and the scripts. Nothing else.

bdist_wheel only includes the package and the scripts. Nothing else.

Adding a MANIFEST.in

After fucking around with many iterations of fruitless attempts of writing a MANIFEST.in file that beautifully builds upon the someone-said default includes I gave in and wrote a very explicit one: https://gitlab.com/snippets/1850708

global-exclude *

graft cogran
graft docs
graft scripts
graft tests

include README.md
include LICENSE

include setup.py
include requirements.txt

global-exclude __pycache__
global-exclude *.py[co]

Now sdist includes all the stuff I want and nothing I do not want. Excellent. Installing the tar.gz however again only installed the package and the scripts.

The wheel again only had the package and the scripts inside.

setup.py: include_package_data=True

You just need to add include_package_data=True to your setup.py, people said. So I did. And no, that would only work for things inside our package, not directories on the same level. So this would change nothing.

setup.py: data_files

Supply the paths to the files in a data_files list, someone said. So I added an explicit list (at this stage I just wanted it to work, who cares about manual effort, future breakage and ugliness):

data_files = [
  ("docs", (
    "docs/images/Areal Weighting.png",
    "docs/images/Attribute Weighting.png",
    "docs/images/postcodes vs districts.png",
    "docs/images/Binary Dasymetric Weighting.png",
    "docs/images/N-Class Dasymetric Weighting.png",
    "docs/help.html"
  ))
]

And yes, now these files end up in the wheel. But guess what, they still do not get installed anywhere

setup.py: package_data

https://github.com/pypa/sampleproject/blob/master/setup.py#L164 like include_package_data only applies to data inside the package, our’s is on the side.

What now?

Writing one WKT file per feature in QGIS

Someone in #qgis just asked about this so here is a minimal pyqgis (for QGIS 3) example how you can write a separate WKT file for each feature of the currently selected layer. Careful with too many features, filesystems do not like ten thousands of files in the same directory. I am writing them to /tmp/ with $fid.wkt as filename, adjust the path to your liking.

layer = iface.activeLayer()
features = layer.getFeatures()

for feature in features:
  geometry = feature.geometry()
  wkt = geometry.asWkt()
  
  fid = feature.attribute("fid")
  filename = "/tmp/{n}.wkt".format(n=fid)
  
  with open(filename, "w") as output:
    output.write(wkt)

z/x/y.ext tiles to mbtiles/gpkg

I just had some trouble converting a set of tiles I scraped into a nice package. I tried both mb-util and tiles2gpkg_parallel.py. Both seemed to work but QGIS did not display anything. The “solution” was to convert the tiles from 512×512 pixels to 256×256. WTF?

tiles2gpkg_parallel.py also crashed at joining its intermediate files if used in Python 3.6. It needs “-tileorigin ul” for OSM-like tile names.

What does it look like if you move all countries onto the same location?

Note from 2019-12-07: This is neither efficient nor up-to-date with modern PROJ. Better don’t copy and paste but just take non-projection/-transformation parts if you need them…

Sunday pre-lunch Python fun: What does it look like if you move all countries onto the same location?

1
2
3
4
5
6
7
8
9
10
11
12
13
14
15
16
17
18
19
20
21
22
23
24
25
26
27
28
29
30
31
32
33
34
35
36
37
38
39
40
41
42
43
44
45
46
47
48
49
50
51
52
53
54
55
56
57
import fiona
from shapely.geometry import *
from fiona.crs import from_string
from fiona.transform import transform_geom
from shapely.affinity import translate
 
def get_biggest_polygon(multipolygon):
    assert isinstance(geometry, MultiPolygon)
 
    max_area = 0
    biggest_polygon = None
    for polygon in geometry:
        if polygon.area > max_area:
            max_area = polygon.area
            biggest_polygon = polygon
    return biggest_polygon
 
def project_locally(geometry, from_crs):
    """centered on the centroid of the geometry"""
    # ugly because i map/shape back and forth, maybe try shapely instead
    lat = geometry.centroid.y
    lon = geometry.centroid.x
 
    to_crs = from_string("+proj=aeqd  +R=6371000 +lat_0={lat} +lon_0={lon}".format(lat=lat, lon=lon))
    reprojected_geometry = transform_geom(
        from_crs, 
        to_crs, 
        mapping(geometry)
    )
 
    return shape(reprojected_geometry)
 
with fiona.open("ne_10m_admin_0_countries.shp") as countries:
    centered_polygons = []
 
    for country in countries:
        geometry = shape(country['geometry'])
 
        # only use the biggest part of each country, otherwise everything sucks
        if isinstance(geometry, MultiPolygon):
            polygon = get_biggest_polygon(geometry)
        else:
            polygon = geometry
 
        # project nicely
        polygon = project_locally(polygon, countries.crs)
 
        # centering on 0,0 is simply moving the geometry by MINUS its x/y
        dx = -polygon.centroid.x
        dy = -polygon.centroid.y
        translated_polygon = translate(polygon, dx, dy)
 
        centered_polygons.append(translated_polygon)
 
with open("/tmp/outfile.wkt", "w") as sink:
    for polygon in centered_polygons:
        sink.write(polygon.wkt+"\n")

Use this in any way you like but please share your creations and code as well. :)

Some rough explanation: For each country I check if it is a multipolygon and if so, use only its biggest “sub”-polygon in the next steps. I then project the WGS84 coordinates to an Azimuthal Equidistant projection centered on the centroid of the polygon. That new geometry gets shifted to sit on the origin of the system. I collect all those polygons and write them as plain WKT to a file. Styling was done in QGIS.

And for the smart folk, the same but without local projection: