Because my SD card keeps getting corrupted and I always start from scratch, here are my notes on how to turn a Raspberry Pi 2 with an always connected USB disk full of audio media into a nice little mpd server outputting via the 3.5mm jack. Probably works somewhat the same on a Raspberry Pi 3.
Install Archlinux ARM
Install https://archlinuxarm.org/platforms/armv7/broadcom/raspberry-pi-2#installation
And obviously update it right after, add your ssh key, whatever. Then:
Add packages to build a special mpd, sound stuff and common utils:
# pacman -Syu screen wget zip base-devel libmikmod unzip zziplib git doxygen boost alsa-utils hdparm ffmpeg htop libao audiofile libshout libmad faad2 libupnp libmms wavpack avahi libid3tag yajl libmpdclient
Get sound working
Add to /boot/config.cfg:
dtparam=audio=on  # https://archlinuxarm.org/platforms/armv7/broadcom/raspberry-pi-2#wiki
disable_audio_dither=1  # if you get white noise on low volume, https://www.raspberrypi.org/documentation/configuration/config-txt/audio.md
audio_pwm_mode=2  # better audio driver, https://www.raspberrypi.org/forums/viewtopic.php?f=29&t=136445
Make sure audio output is enabled, not muted, in # alsamixer.
# speaker-test -c6 -twav
Connect and mount external disk with all your media
Connect USB disk. Check UUID using ls -l /dev/disk/by-uuid/ or lsblk -f, add it to /etc/fstab at a mount point of your choice:
UUID=12341234-1234-1234-1234-123412341234 /media/egon ext4 defaults,nofail,x-systemd.device-timeout=1 0 2
and made sure that it can spin down by adding /etc/udev/rules.d/50-hdparm.rules (you might want to verify the hdparm call works first):
ACTION=="add|change", KERNEL=="sd[a-z]", ATTR{queue/rotational}=="1", RUN+="/usr/bin/hdparm -B 1 -S 60 -M /dev/%k"
Then check if things work with # mount -a
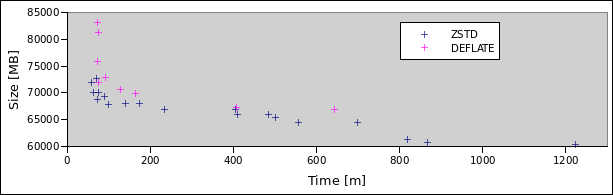
Compile mpd with zip and curl support (optional, if not wanted, just install mpd from the repos)
I compiled my own mpd because I wanted zip support and Archlinux’s does not ship with that.
$ wget https://aur.archlinux.org/cgit/aur.git/snapshot/mpd-git.tar.gz

$ tar xfvz mpd-git.tar.gz

$ cd mpd-git

$ nano PKGBUILD
Add ‘armv7h’ to the archs
and add some fancy configure options:
      --enable-zzip \
      --enable-mikmod \
      --enable-modplug \
      --enable-curl
$ makepkg

# pacman -U the resulting package
Takes about 30 minutes.
Configure mpd
/etc/mpd.conf:
user "mpd"
pid_file "/run/mpd/mpd.pid"
db_file "/var/lib/mpd/mpd.db"
state_file "/var/lib/mpd/mpdstate"
playlist_directory "/var/lib/mpd/playlists"
music_directory    "/media/egon"

audio_output {
  type            "alsa"
  name            "default"
  mixer_type      "software"      # optional
}
# systemctl enable mpd

# systemctl start mpd
WLAN
TODO ;)
Once it all works, make an image of it so that next time installation is just dd.


 Hillshading
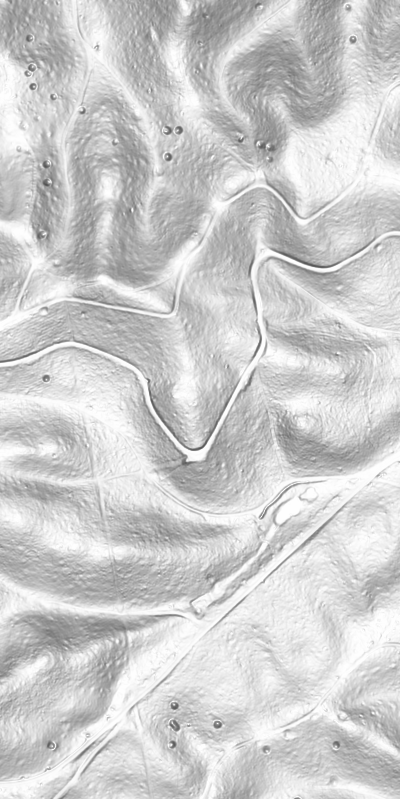 Overhead Hillshading
 Hillshading blended with Overhead Hillshading (Darken mode)
 Multidirectional Hillshading